If you’ve only tasted store-bought potatoes, it’s time to experience the remarkable flavor and convenience of homegrown spuds by learning how to plant seed potatoes. The key is to start with certified disease-free seed potatoes. Then follow these simple, step-by-step instructions for preparing and planting your seed potatoes at the right time and location.
What Are Seed Potatoes?
Seed potatoes are potatoes that were specially grown for planting. Unlike the potatoes you buy for cooking, seed potatoes have not been treated with a growth inhibitor, which prevents potatoes from sprouting in your pantry. Tempted to plant potatoes from the grocery store? They likely won’t sprout well because of the inhibitors, plus they may harbor plant pathogens that could harm your crop. Also, some potato varieties may be patented, making them illegal to propagate. It’s always best to buy disease-free seed potatoes at garden supply stores and online.
When to Plant Seed Potatoes
The planting time depends on your last average frost date. Generally, the time window for planting potatoes is two to four weeks before your area’s last frost date in spring. This can be as early as March and as late as May for northern locations. In warm regions, seed potatoes are often planted in the fall or winter. Potatoes form best at soil temperatures between 60 and 70°F.
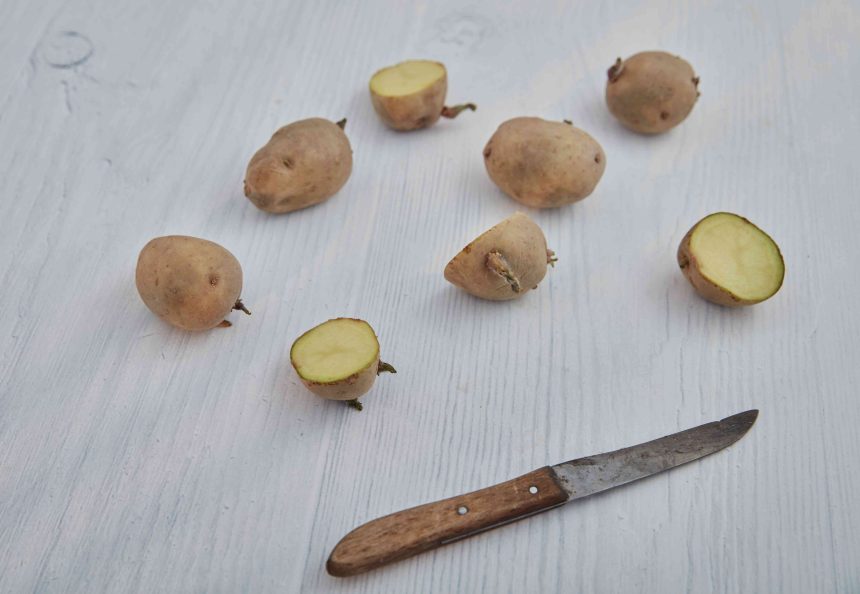
How to Prepare Seed Potatoes for Planting
Before you can plant seed potatoes, they need a little preparation to help set them up for success in your garden.
1. Sprout the Seed Potatoes
You’ll have more planting success if you plant “chitted” or sprouted seed potatoes instead of potatoes without sprouts. Tubers with healthy shoots get a head start on the growing process and are less likely to rot in the ground.
To chit your seed potatoes, place the uncut tubers in a place with bright light and cool temperatures for a few days. The eyes (buds) on the potatoes will swell and grow into sprouts.
2. Cut the Seed Potatoes
Depending on their size, your seed potatoes may require cutting after chitting. Using a sharp, clean knife, cut large seed potatoes into smaller pieces with at least two eyes or sprouts on each piece. Each of these eyes will sprout into a new plant. Small seed potatoes less than 2 inches across can be kept whole.
3. Let the Pieces Dry
After you have cut the potatoes, spread the pieces in a single layer on a tray and let them dry for two to three days in a well-ventilated location to form a callus layer on the cut ends. This extra drying time helps to protect the seed potatoes from rot once they are planted in the ground.
Site Preparation for Seed Potatoes
Before planting your chitted seed potatoes, use these tips to provide the best growing conditions for your potato crop.
- Select a sunny spot. Choose a location with full sun, which means at least 6 hours of direct, unfiltered sunlight daily.
- Ensure good drainage. Well-drained soil is key because the tubers form below the surface and in poorly drained soil or heavy clay, they will likely rot before they’re ready for harvest.
- Amend the soil. Work a 2-inch layer of compost into your garden soil before you plant. This organic soil amendment will improve soil fertility and drainage.
- Rotate crops. Avoid planting potatoes in the same location where potatoes and other members of the nightshade family (tomatoes, eggplants, peppers) were grown for the past three years. Rotating crops helps minimize pests and diseases.
Steps for Planting Seed Potatoes in Garden Beds
Once your site and your seed potatoes are ready for planting, follow these steps to start growing your potatoes.
1. Dig trenches or holes.
For a large planting, trenches are an efficient way to plant seed potatoes. Dig a trench 4 inches deep if your soil is heavy and 6 inches deep if your soil is light. For smaller plantings, dig individual holes for each seed potato.
2. Place seed potatoes.
Plant your seed potatoes with their cut sides down (if applicable) and sprouts facing up.
3. Follow correct spacing.
Space the potatoes 12 to 15 inches apart in rows 24 inches apart. Cover the potatoes with 2 to 4 inches of soil.
4. Water well.
After covering your seed potatoes, water the planting area well. Keep the soil evenly moist until sprouts emerge after planting.
5. Hill the potatoes as they grow.
About a week after planting, shoots will start to poke through the soil. When the shoots are 6 to 8 inches tall, mound several inches of soil around them. This process is called hilling and creates an area of loose soil where tubers easily form while being shaded from the sun. If exposed to the sun, they will turn green and become inedible. For the best potato harvest, hill the potato plants again two to three weeks later.
Planting Seed Potatoes in Containers
Smaller types of potatoes such as fingerling potatoes are well-suited for containers and often produce prolific harvests in a relatively small space. To plant potatoes in containers, you need a pot at least 2 to 3 feet deep. In general, one potato plant will need about 2½ gallons of growing space.
Use a good quality potting mix that drains well in the container. Add about 3 inches of the mix to your pot, then plant your seed potatoes. Space the seed potatoes about 10 inches apart from each other, and allow about 4 inches of space from the sides of the container. Then follow the same steps as you would when growing seed potatoes in a garden bed.